Migrating your Magento store to a new hosting environment is one of the most complex and high-stakes technical operations you can undertake as an ecommerce merchant. Done well, it delivers faster performance, greater reliability, and a stronger foundation for growth. Done poorly, it can result in data loss, prolonged downtime, damaged search rankings, and broken customer experiences.
This checklist walks you through every stage of the process - from initial planning through to post-migration monitoring giving you a structured, repeatable framework to follow regardless of the size or complexity of your store.
Pre-Migration Planning
Define Migration Goals and Requirements
Before touching a single file or spinning up a new server, you need to be clear on *why* you are migrating and *what* a successful migration looks like. Skipping this step is one of the most common reasons migrations run over budget, cause unexpected downtime, or fail to deliver any tangible improvement.
Identify Your Reasons for Migrating
Start by documenting the primary drivers behind the move. Common motivations include:
-
Poor performance - slow page load times, high server response times, or an inability to handle peak traffic
-
Unreliable uptime - frequent outages or a hosting provider that cannot meet your SLA requirements
-
Lack of scalability - your current plan cannot grow with your business or handle seasonal spikes
-
Security concerns - outdated infrastructure, lack of PCI compliance support, or insufficient DDoS protection
-
Cost optimisation - moving to a more cost-effective solution without sacrificing performance
-
End of contract or support - your current provider is discontinuing a plan or ending support for your server configuration
-
Magento version upgrade - migrating to a host that better supports Magento 2.x or a specific version requirement
Being specific here matters. "We want better performance" is too vague. "We need page load times under two seconds and the ability to handle 500 concurrent users during sale events" gives you something measurable to validate against after the migration.
Define What Success Looks Like
Translate your reasons into clear, measurable success criteria. Examples include:
-
Site loads in under two seconds on mobile and desktop
-
Zero loss of historical order data or customer accounts
-
All existing URLs resolve correctly with no broken links
-
Payment gateways process transactions without errors
-
No drop in organic search rankings within 30 days of go-live
-
Downtime during cutover does not exceed a defined window
Write these down and share them with everyone involved in the project.
Establish Your Constraints
Document any non-negotiable constraints that will shape how the migration is carried out:
-
Budget - maximum spend including new hosting costs, developer time, and tooling
-
Timeline - hard deadlines or trading periods to avoid
-
Downtime tolerance - how much downtime, if any, is acceptable
-
Compliance requirements - data residency, PCI DSS, or GDPR obligations
-
Team availability - who is responsible and whether you need external expertise
Involve the Right Stakeholders Early
A Magento migration touches your marketing team, finance team, customer service team, and potentially logistics partners. Identify all stakeholders early, gather their requirements, and ensure their concerns are reflected in your success criteria before work begins.
Audit Your Current Environment
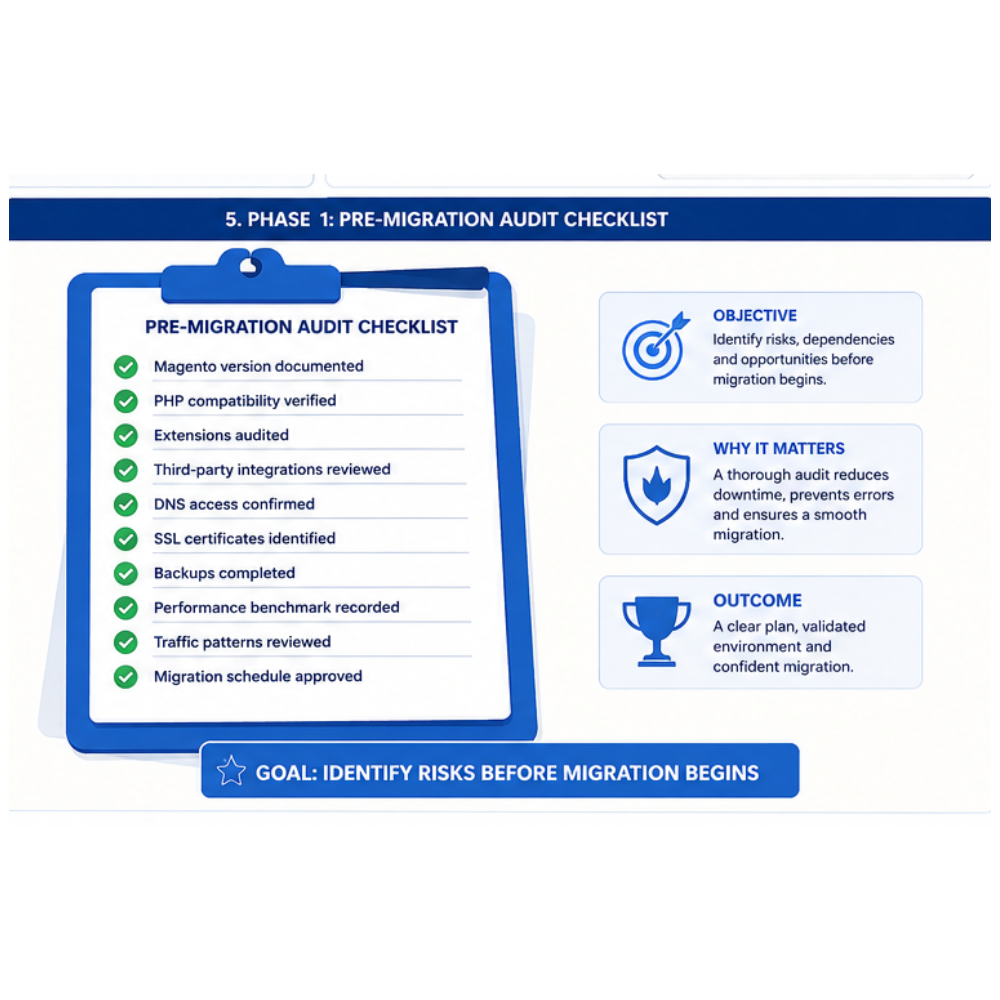
Before you can migrate successfully, you need a complete and accurate picture of what you are migrating. A thorough audit removes guesswork, surfaces compatibility issues early, and gives your new hosting provider the information they need to configure your new server correctly.
Document Your Current Server Specifications
Record the technical specification of your existing environment:
-
Operating system - Linux distribution and version
-
Web server - Apache or Nginx, and the version number
-
PHP version - exact version and all active extensions
-
MySQL or MariaDB version - database engine and version
-
Memory and CPU allocation - RAM, CPU cores, and any resource limits
-
Storage - total disk space, usage, and storage type (SSD or HDD)
-
Server location - data centre region
Audit Your Magento Installation
Document the specifics of your Magento installation:
-
Magento edition and version - Community or Commerce, and the exact version number
-
Installed extensions and modules - full list with version numbers and sources
-
Active themes - custom or off-the-shelf, including any child themes
-
Customisations - core code overrides, custom modules, or bespoke functionality
-
Cron jobs - all scheduled tasks, frequency, and purpose
-
Deployment mode - developer, default, or production
Pay particular attention to custom and third-party extensions. These are the most common source of compatibility problems when moving to a new server.
Review Your Database
-
Database size - affects transfer time and storage requirements
-
Log and reporting tables - tables such as `report_event` and `customer_log` can grow very large; identify these now so you can clean them before migrating
-
Database engine - confirm all tables are using InnoDB
Catalogue Your Integrations
Make a full list of every external system your store connects to, including payment gateways, shipping platforms, ERP and CRM systems, email service providers, search platforms, and analytics tools. For each, note the credentials, API keys, and configuration settings currently in use.
Measure Your Current Performance
Capture baseline metrics before you migrate so you have something to compare against afterwards:
-
Page load times for key pages
-
Time to First Byte (TTFB)
-
Core Web Vitals scores
-
Uptime percentage over the past three to six months
Identify Known Issues
Use the audit as an opportunity to document any existing problems - outdated extensions, known module conflicts, deprecated PHP functions, or oversized media files. A migration is the right moment to resolve long-standing issues, but only if you are aware of them going in.
Choose Your New Hosting Provider
Choosing the right hosting provider is one of the most consequential decisions in the entire migration process. With a platform as resource-intensive as Magento, not all hosting is created equal.
Understand the Types of Magento Hosting Available
-
Shared hosting - rarely suitable for Magento; resource contention from neighbouring sites is a constant risk
-
VPS - a dedicated allocation on a shared physical server; suitable for small to medium stores with the right configuration
-
Dedicated server - maximum performance and control; well suited to larger, high-traffic stores
-
Cloud hosting - highly flexible and scalable; ideal for variable traffic, though costs can be harder to predict
-
Magento-optimised managed hosting - pre-configured for Magento with specialist support; often the most practical option for merchants who do not want to manage infrastructure themselves
Define Your Requirements First
Rather than starting with a list of providers and working backwards, use your audit findings to establish a baseline: minimum CPU, RAM, and storage; required PHP and MySQL versions; managed or unmanaged preference; geographic requirements; budget ceiling; uptime expectations; and compliance needs.
Key Factors to Evaluate
-
Magento expertise - does the provider have documented experience with your specific Magento version?
-
Performance infrastructure - SSD or NVMe storage, data centre proximity to your customer base, support for Varnish and Redis, and network redundancy.
-
Scalability - how quickly can resources be scaled, and can it be done without downtime?
-
Uptime SLA - look for at least 99.9% uptime backed by a meaningful service level agreement, not just token credits.
-
Security - firewalls, DDoS mitigation, malware scanning, intrusion detection, and SSL management. Confirm PCI DSS support if required.
-
Backup policy - frequency, retention period, off-site storage, and how straightforward the restoration process is.
-
Support quality - channels available, hours of access, response times, and the technical depth of the support team. Check independent reviews on Trustpilot and G2.
-
Migration assistance - understand exactly what is included and get the specifics in writing before you commit.
-
Pricing and contract terms - compare total cost of ownership, not just headline monthly price. Avoid long lock-in contracts when trying a provider for the first time.
Validate With References and a Support Test
Ask for references from existing Magento customers of similar size. Raise a pre-sales support query with each shortlisted provider - the quality of the response will tell you a great deal about the day-to-day support experience.
Select the Right Hosting Plan
Once you have chosen your provider, select the specific plan that fits your store. Underspecify and your store will struggle under real traffic; overspecify and you are paying for resources you will never use.
Use Your Audit Data as Your Starting Point
Size your plan for peak traffic - during sales events and promotional campaigns - not just average daily load. Build in a sensible margin above your current resource usage.
Key Resources to Evaluate
-
RAM - 2GB is an absolute minimum for a small store; most mid-sized stores need 4GB or more; high-traffic operations may require 8GB and above
-
CPU - look for a clear core count and guaranteed allocation rather than vague references to "shared CPU"
-
Storage - insist on SSD or NVMe; HDD is not suitable for a production Magento store
-
PHP configuration - confirm support for your required PHP version and the ability to configure `memory_limit`, `max_execution_time`, and `opcache`
-
Bandwidth - check the monthly data transfer allowance and understand overage charges
Confirm the Full Software Stack
Make sure the plan supports everything Magento needs: Nginx or Apache, PHP-FPM, MySQL 8.0 or MariaDB, Redis, Elasticsearch or OpenSearch, and Varnish. On managed plans these are often pre-configured; on unmanaged plans, you are responsible for setting them up yourself.
Managed Versus Unmanaged
Managed plans include server monitoring, security patching, and technical support. For merchants without in-house server expertise, managed hosting is almost always the right call. If you opt for managed, read the scope carefully - providers define the term differently.
Staging Environment
A staging environment is essential for safely testing updates and extensions. Check whether one is included or available as an add-on, and confirm it is a true replica of your production environment.
Plan for Growth and Validate With Your Provider
Choose a plan that reflects where your business is heading over the next twelve to twenty-four months. Before committing, share your audit findings with your provider and ask them to confirm the plan is genuinely appropriate. A reputable provider will give you an honest answer.
Set a Migration Timeline and Team
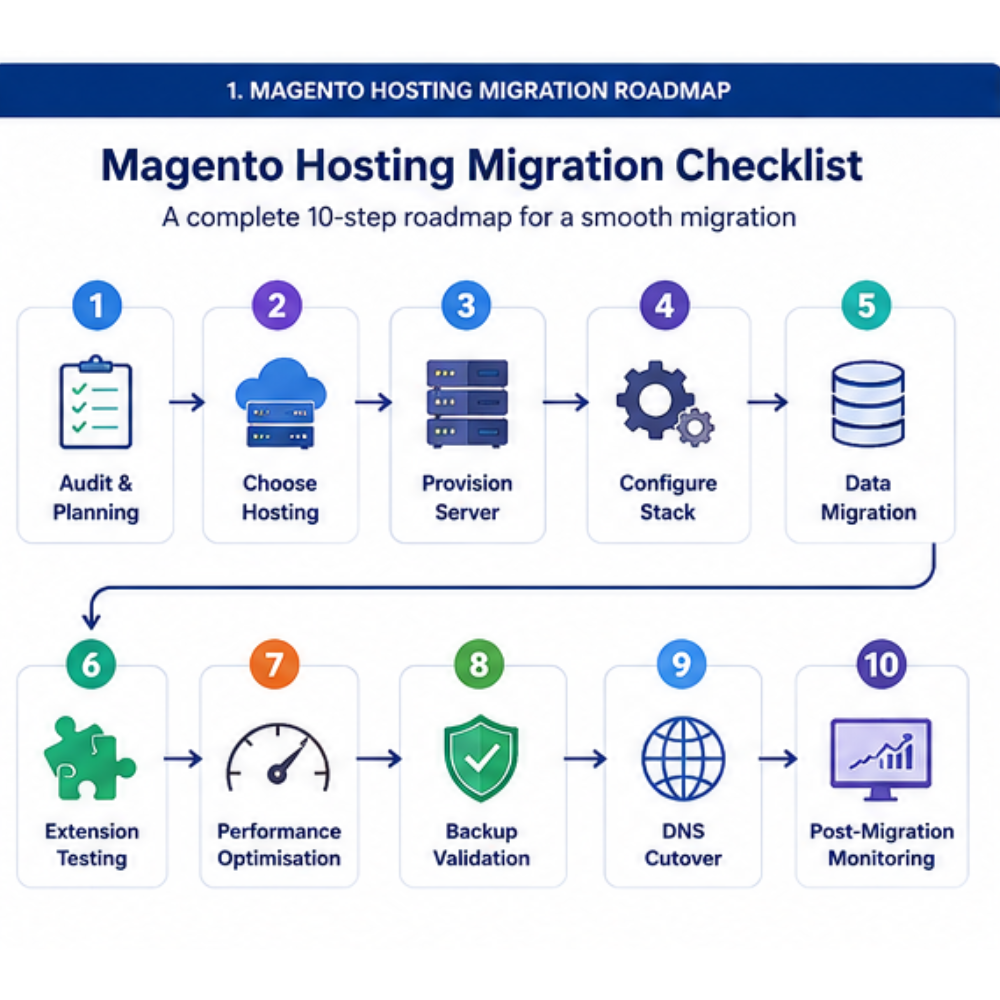
A Magento migration without a clear timeline and defined responsibilities is a project waiting to go wrong. Delays and critical tasks falling through the gaps are almost always the result of poor planning at this stage rather than technical failure during the migration itself.
Assemble Your Migration Team
Every key role needs a named owner:
-
Project lead - owns the overall migration plan and is the escalation point if something goes wrong
-
Backend developer - handles server configuration, file and database transfer, and Magento-specific technical tasks
-
Frontend developer - validates the theme, templates, and user-facing functionality on the new environment
-
DevOps or server administrator - responsible for new server setup, security configuration, and performance tuning
-
QA tester - runs structured testing across the staging environment before go-live
-
SEO lead - audits redirects, validates metadata, and monitors rankings before and after cutover
-
Hosting provider contact - your named point of contact at the new provider
If you are working with an agency, confirm in writing which tasks are their responsibility and which remain with your internal team.
Build a Realistic Timeline
A typical migration timeline might look like this:
-
Weeks 1-2 - environment audit, provider selection, server provisioning, and staging setup
-
Weeks 3-4 - file and database migration to staging, configuration updates, and initial testing
-
Weeks 5-6 - full QA, integration testing, performance testing, and issue resolution
-
Week 7 - final checks, DNS preparation, and go-live readiness sign-off
-
Week 8 - DNS cutover, go-live, and post-migration monitoring
Simpler migrations may move faster; those involving custom development or a simultaneous Magento version upgrade will take longer.
Avoid Peak Trading Periods
Schedule your go-live window during your store's lowest-traffic period - typically mid-week and overnight - and avoid the weeks surrounding events such as Black Friday or planned sales campaigns.
Define a Change Freeze and Contingency Plan
Establish a change freeze on your production environment in the run-up to the migration: no new extensions, theme updates, or significant configuration changes. Build ten to twenty percent contingency time into your schedule, and define your rollback plan before you begin. If cutover does not go as expected, you need to know in advance who makes the call to revert and how quickly it can be done.
Communicate With Stakeholders
Keep your customer service, marketing, and key account teams informed throughout the process. A short internal communication plan, who gets updated, how often, and through what channel - prevents a great deal of confusion during what can be a stressful period.
Backup and Data Security
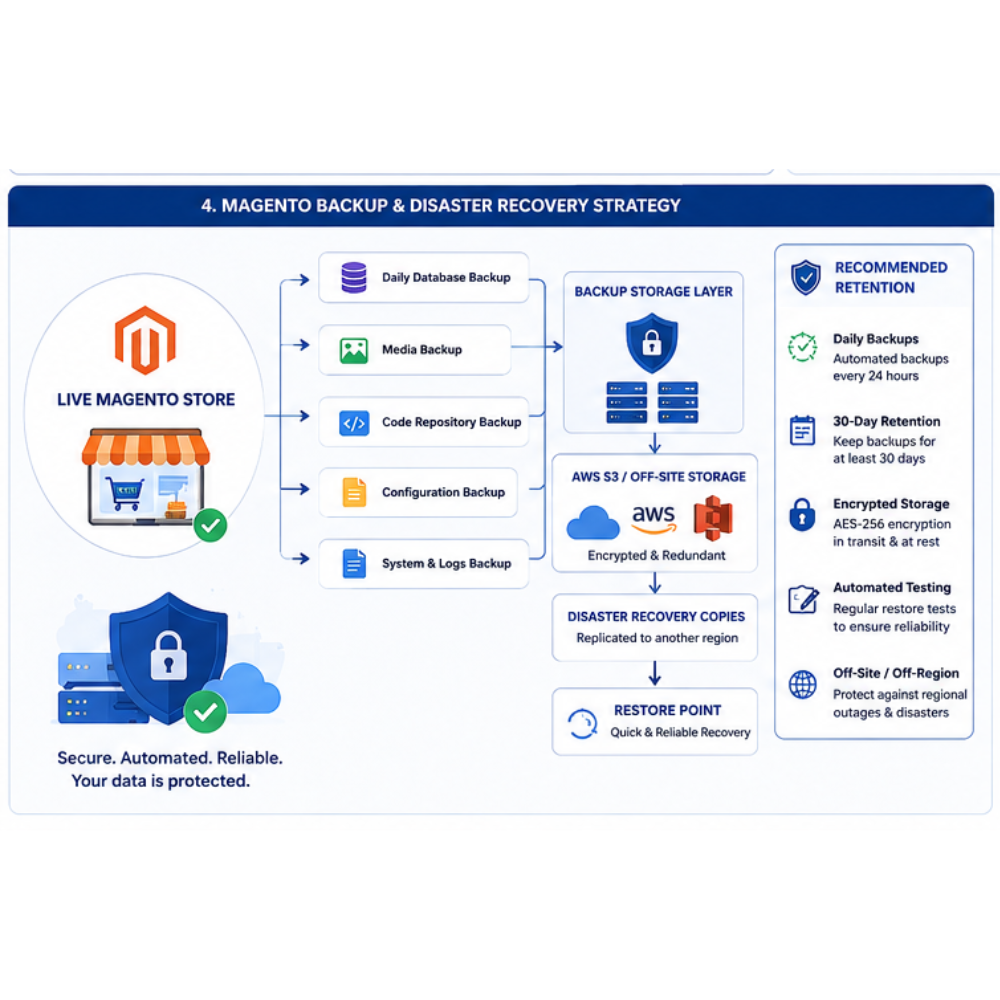
Full Database Backup
Your database is the single most critical component of your Magento store. It contains every customer account, order, product, configuration setting, and piece of content your business depends on. Before any migration work begins, taking a complete, verified backup is non-negotiable.
How to Take a Full Database Backup
The most reliable method is `mysqldump` directly from the command line:
mysqldump -u [username] -p \
--single-transaction \
--routines \
--triggers \
--add-drop-table \
[database_name] > magento_backup_[date].sql
The `--single-transaction` flag ensures a consistent snapshot without locking tables, so your live store can continue operating during the backup. For large databases, compress on the fly:
mysqldump -u [username] -p --single-transaction [database_name] | gzip > magento_backup_[date].sql.gz
Clean Up Before You Back Up
Truncating bloated tables before taking your backup can reduce its size dramatically. Common candidates include `report_event`, `customer_log`, `customer_visitor`, and `catalogsearch_query`. Confirm which tables are safe to truncate for your specific Magento version before doing so.
Verify the Backup
A backup you have never tested is a backup you cannot rely on. At minimum, test file integrity:
gzip -t magento_backup_[date].sql.gz
For greater confidence, restore the backup to a separate test environment and confirm that key tables are present and row counts match production.
Store Securely and Take a Final Backup Before Cutover
Store your backup off-site, on a cloud storage service such as Amazon S3, or a dedicated backup location and encrypt it if it will pass through any environment outside your control. Take a fresh final backup of the production database immediately before your DNS cutover to capture any orders or changes that occurred during the migration preparation period.
Full File System Backup
Alongside your database, a complete backup of your Magento file system is the second pillar of your pre-migration safety net. The file system holds everything that makes your store function - the application code, your theme, your extensions, your media library, and your configuration files.
How to Take a Full File System Backup
Create a compressed archive of your Magento root directory using `tar`:
tar -czvf magento_files_backup_[date].tar.gz \
--exclude='./var/cache' \
--exclude='./var/log' \
--exclude='./var/session' \
--exclude='./generated' \
/path/to/magento/root/
The excluded directories can be rebuilt on the new server. For large media directories, back up the codebase and media separately for more flexible transfer options:
Codebase without media
tar -czvf magento_code_backup_[date].tar.gz \
--exclude='./pub/media' \
/path/to/magento/root/
Media separately
tar -czvf magento_media_backup_[date].tar.gz /path/to/magento/root/pub/media/
Back Up Configuration Files Separately
Your `env.php` and `config.php` files contain sensitive credentials and environment-specific settings that are easy to overlook and painful to reconstruct. Back them up separately and store them securely. Note that these files will need to be updated on the new server — they are not simply copied across unchanged.
Verify and Store Off-Site
Test your archive integrity:
tar -tzvf magento_files_backup_[date].tar.gz
Check the total file count and archive size against your expectations. Store the backup off-site, apply appropriate access controls, and take a final incremental sync immediately before cutover.
Store Backups Securely Off-Site
Both your database and file system backups must be stored separately from your current server. If your server fails, is compromised, or is decommissioned, a backup stored on the same machine offers no protection.
Suitable options include cloud object storage such as Amazon S3, Google Cloud Storage, or Azure Blob Storage; a dedicated backup service provided by your current host; or secure internal infrastructure. Whichever you choose:
-
Encrypt backups at rest and in transit - your database contains personal customer data subject to GDPR
-
Apply strict access controls - limit who can access backup files and from where
-
Confirm the upload has completed successfully - verify file size and integrity after transfer, not just before
-
Retain at least two backup copies - taken at different points in time, in case one is corrupted or incomplete
-
Document the restoration procedure - store clear instructions alongside the backups so they can be acted on quickly under pressure
Verify Backup Integrity
Taking a backup is only half the job. Before proceeding with any migration work, confirm that both your database and file system backups are complete and restorable.
For the database, restore the backup to a clean test environment and confirm that the database loads correctly, key tables are present, row counts match production, and the Magento admin panel is accessible. For the file system, extract the archive and spot-check a selection of files across the codebase, theme, extensions, and media directory.
Document what you checked and when. If either backup fails verification, take a new one and verify again before proceeding. Never begin a migration with an unverified backup.
New Server Setup and Configuration
Install Required Software Stack
Your new server must be provisioned with the complete software stack that Magento requires before any files or data are transferred. The exact versions you install must be compatible with your specific Magento version - consult the official Magento system requirements for your release.
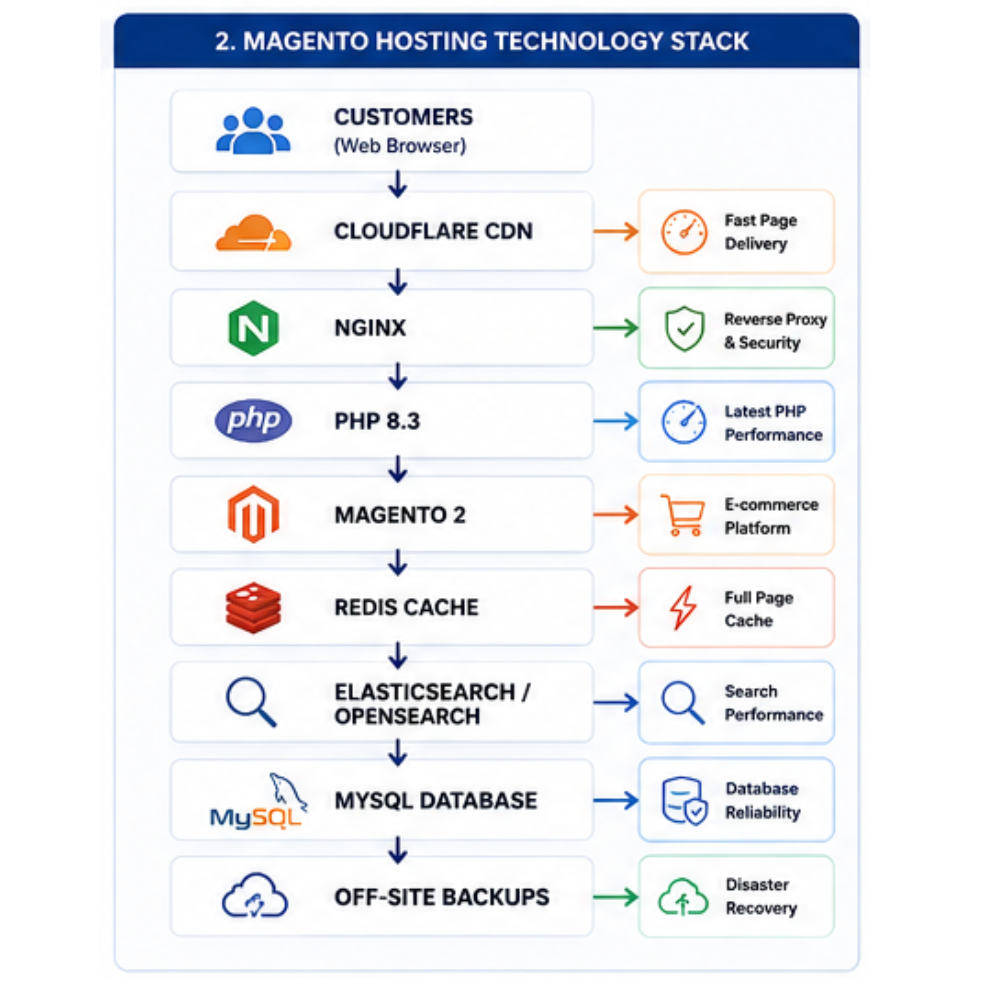
A standard Magento 2.x stack includes:
-
Operating system - Ubuntu 22.04 LTS or equivalent stable Linux distribution
-
Web server - Nginx (recommended) or Apache
-
PHP - the version required by your Magento release, with all required extensions: `bcmath`, `ctype`, `curl`, `dom`, `gd`, `hash`, `iconv`, `intl`, `mbstring`, `openssl`, `pdo_mysql`, `simplexml`, `soap`, `xsl`, `zip`, and `sockets`
-
MySQL 8.0 or MariaDB - with InnoDB as the default storage engine
-
Redis - for session storage and full-page cache
-
Elasticsearch or OpenSearch - required for catalogue search in Magento 2.x
-
Varnish - for reverse proxy caching (recommended for production)
-
Composer - for dependency management
If you are on a managed Magento hosting plan, many of these components will be pre-installed and configured by your provider. Confirm which elements are included and which require your own setup before you begin.
Configure PHP Settings for Magento
Out-of-the-box PHP defaults are not suitable for a production Magento installation. Update your `php.ini` configuration to reflect Magento's requirements:
memory_limit = 756M
max_execution_time = 18000
zlib.output_compression = On
realpath_cache_size = 10M
realpath_cache_ttl = 7200
Also configure OPcache, which has a significant impact on Magento's performance:
opcache.enable = 1
opcache.memory_consumption = 512
opcache.max_accelerated_files = 60000
opcache.consistency_checks = 0
opcache.validate_timestamps = 0
Restart PHP-FPM after making changes and verify the new settings are active using `phpinfo()` or the command line.
Set Up SSL/TLS Certificate
Magento requires HTTPS for its admin panel, and running your entire storefront over HTTPS is essential for both security and SEO. Set up your SSL certificate on the new server before completing the migration.
If you are using Let's Encrypt, Certbot makes certificate installation straightforward on most Linux distributions. If you have a commercial certificate, follow your provider's installation instructions for your specific web server.
Confirm that:
-
The certificate covers your primary domain and any subdomains in use (e.g. `www`)
-
HTTP traffic is automatically redirected to HTTPS
-
The certificate's expiry date and renewal process are clearly documented
-
HTTPS is working correctly before you update Magento's base URLs
Configure Firewall and Security Rules
Lock down your new server before transferring any data to it. A basic firewall configuration for a Magento server should:
-
Allow inbound traffic on ports 80 (HTTP), 443 (HTTPS), and your SSH port
-
Restrict SSH access to known IP addresses only
-
Block all other inbound traffic by default
-
Allow outbound connections for package updates, email, and external API calls
If your store connects to external services that require IP whitelisting - such as payment gateways or shipping APIs - note your new server's IP address early in the setup process so you can submit whitelist requests in good time before go-live.
Also consider:
-
Disabling root SSH login and enforcing key-based authentication
-
Installing and configuring `fail2ban` to protect against brute-force attacks
-
Setting up intrusion detection if not provided by your hosting plan
Set Up Cron Jobs
Magento relies on cron jobs for a wide range of background processes including reindexing, sending transactional emails, processing order queues, generating sitemaps, and running scheduled imports and exports. Without correctly configured cron jobs, many core functions will not work as expected.
Add the Magento cron entries to your server's crontab:
* * * * * php /path/to/magento/bin/magento cron:run >> /path/to/magento/var/log/magento.cron.log 2>&1
* * * * * php /path/to/magento/update/cron.php >> /path/to/magento/var/log/update.cron.log 2>&1
* * * * * php /path/to/magento/bin/magento setup:cron:run >> /path/to/magento/var/log/setup.cron.log 2>&1
After setting up cron, verify it is running correctly by checking the cron log files and confirming that scheduled jobs are being processed. Also cross-reference any custom or third-party cron jobs identified during your environment audit and ensure these are replicated on the new server.
Configure Email (SMTP) Settings
Magento sends a significant volume of transactional emails — order confirmations, shipping notifications, password resets, and more. Before go-live, confirm that email delivery is correctly configured on your new server.
Most production Magento stores use a dedicated SMTP service or email delivery platform rather than relying on the server's local mail agent. Common options include SendGrid, Mailgun, Amazon SES, and Postmark.
Configure your chosen SMTP settings within Magento's admin panel under: Stores > Configuration > Advanced > System > Mail Sending Settings, or via a dedicated SMTP extension if you are using one. Send test emails after configuration to confirm delivery, and check spam scores to ensure your emails are reaching inboxes rather than junk folders.
Magento Files and Database Migration
Transfer Files to New Server
With your new server configured and your backups verified, you are ready to begin transferring your Magento files. For most stores, `rsync` is the most practical transfer method - it is fast, resumable, and can be run multiple times to sync only the files that have changed since the previous run:
rsync -avz --progress /path/to/magento/root/ user@newserver:/path/to/magento/root/
For very large media directories, consider running the media transfer as a separate operation and using the `--checksum` flag to verify file integrity during the sync. If you split your backup into codebase and media archives, transfer and extract each separately.
After the transfer is complete, verify that the file count and total size on the new server match the source. Spot-check a selection of files, including theme files, extension files, and media assets, to confirm they have transferred without corruption.
Import the Database
Transfer your database backup to the new server and import it into your newly created database:
If uncompressed
mysql -u [username] -p [database_name] < magento_backup_[date].sq
If compressed
gunzip < magento_backup_[date].sql.gz | mysql -u [username] -p [database_name]
For large databases, consider using tools such as `mydumper` and `myloader` for faster parallel import, or `Percona XtraBackup` for hot backups that can be restored more efficiently.
After import, verify the database has loaded correctly by checking that key tables are present and row counts match your production database. Run a quick spot check on the `sales_order`, `customer_entity`, and `catalog_product_entity` tables to confirm your critical data is intact.
Update `env.php` and `config.php`
Your `env.php` file contains environment-specific settings — primarily your database credentials — that must be updated to reflect your new server configuration. Open the file and update the database connection details:
```php
'db' => [
'connection' => [
'default' => [
'host' => 'new_db_host',
'dbname' => 'new_database_name',
'username' => 'new_db_username',
'password' => 'new_db_password',
],
],
],
Also update any cache backend configuration in `env.php` if your new server uses different Redis connection details, and review the `crypt/key` value to confirm it has transferred correctly - this key is used to encrypt sensitive data in the database and must match.
The `config.php` file contains your enabled module list and is generally transferred unchanged, but review it to confirm no environment-specific settings have been inadvertently included.
Update Base URLs in the Database
Magento stores its base URLs in the `core_config_data` table. If your new server uses a different domain or a staging subdomain during testing, update these values before attempting to load the site:
UPDATE core_config_data SET value = 'https://your-new-domain.com/' WHERE path = 'web/unsecure/base_url';
UPDATE core_config_data SET value = 'https://your-new-domain.com/' WHERE path = 'web/secure/base_url';
If you are testing on a staging domain before go-live, set the staging domain here initially, then update to your production domain as part of the cutover process. After updating the base URLs, flush the Magento cache to ensure the changes take effect.
Set Correct File and Folder Permissions
Incorrect file permissions are one of the most common causes of issues after a Magento file transfer. Magento requires specific permissions on different parts of the file system to function correctly:
Set ownership
chown -R www-data:www-data /path/to/magento/
Set directory permissions
find /path/to/magento/ -type d -exec chmod 755 {} \;
Set file permissions
find /path/to/magento/ -type f -exec chmod 644 {} \;
Make bin/magento executable
chmod +x /path/to/magento/bin/magento
Directories that Magento writes to - including `var/`, `pub/media/`, `pub/static/`, and `generated/` - require write permissions for the web server user. After setting permissions, run the Magento readiness check to confirm there are no permission-related errors before proceeding.
Third-Party Integrations and Extensions
Verify Extension Compatibility
Before testing any integrations, confirm that every extension installed on your store is compatible with the PHP version and Magento version running on your new server. Extensions that worked correctly on your old server may behave differently - or fail entirely - if the underlying environment has changed.
Work through your extension list systematically:
-
Check each extension's documentation or Marketplace listing for supported PHP and Magento versions
-
Look for known conflicts between extensions you have installed
-
Check for updates to any extensions that are not on their latest version
-
Remove or replace any extensions that are no longer maintained or compatible
Pay particular attention to extensions that interact with payment processing, shipping, or checkout, as failures in these areas have an immediate commercial impact.
Reconfigure Payment Gateways
Payment gateways do not automatically carry over to a new server. Each gateway will need to be reviewed and reconfigured:
-
Update API keys and credentials within the Magento admin or the gateway's extension settings
-
Submit your new server's IP address for whitelisting with any gateway that requires it
-
Switch gateways from sandbox or test mode to production mode and confirm the setting is correct
-
Process test transactions through each gateway to confirm end-to-end functionality before go-live
Do not assume that credentials copied from your old configuration will work without testing. Gateway providers sometimes invalidate credentials or require re-authentication when they detect a change in server environment.
Reconfigure Shipping Integrations
As with payment gateways, shipping carrier integrations and fulfilment platform connections need to be verified and reconfigured on the new server:
-
Update API keys and account credentials for each carrier or platform
-
Confirm that shipping rate requests are returning correctly
-
Test the full order fulfilment workflow end to end, including label generation if applicable
-
Verify that tracking information is being passed back to Magento correctly
Update API Keys and Credentials
Beyond payment and shipping, work through the full integration list from your environment audit and update credentials for every connected service. This typically includes:
-
CRM platforms
-
Email service providers
-
ERP and inventory management systems
-
Search platforms such as Algolia
-
Analytics and tag management tools
-
Any custom API connections or webhooks
For each integration, confirm the connection is active on the new server, not just that the credentials have been entered. A test API call or a check of the integration's activity log will confirm whether communication is actually working.
Test CRM, ERP, and Marketing Tool Connections
Once credentials have been updated, run end-to-end tests for each major integration:
-
Place a test order and confirm it flows correctly into your ERP or order management system
-
Register a test customer account and confirm the record appears in your CRM
-
Submit a test form or trigger a test event and confirm the data reaches your marketing platform
-
Verify that webhook endpoints on the new server are accessible from external services
Document the outcome of each test. Any integration that does not pass should be investigated and resolved before go-live, not after.
Performance Configuration
Enable and Configure Caching
Magento's built-in caching is one of the most impactful performance levers available to you. On your new server, enable and configure the following:
Redis for full-page cache and session storage - configure in `env.php`:
```php
'cache' => [
'frontend' => [
'default' => ['backend' => 'Magento\\Framework\\Cache\\Backend\\Redis', ...],
'page_cache' => ['backend' => 'Magento\\Framework\\Cache\\Backend\\Redis', ...]
]
],
'session' => ['save' => 'redis', ...]
Varnish for reverse proxy caching - for high-traffic stores, Varnish provides significant performance gains by serving cached full-page responses without hitting PHP or the database. Export Magento's Varnish configuration file from the admin panel and apply it to your Varnish instance.
After configuring caching, warm the cache by crawling key pages and confirm via response headers that pages are being served from cache as expected.
Configure a CDN
A content delivery network reduces load on your origin server and improves page load times for visitors by serving static assets - images, CSS, JavaScript from edge nodes geographically close to the user.
Popular CDN options for Magento include Cloudflare, Fastly, and Amazon CloudFront. Configure your chosen CDN to serve static assets from your `pub/static/` and `pub/media/` directories, and update Magento's base URLs for static content and media in the admin panel if your CDN uses a separate subdomain.
Test that static assets are being served from the CDN after configuration and confirm cache invalidation is working correctly when you deploy static content changes.
Enable Flat Catalog and Indexing
Magento's flat catalog feature pre-compiles product and category data into simplified database tables, which can significantly improve frontend performance for stores with large catalogues. Enable flat catalog under Stores > Configuration > Catalog > Catalog > Use Flat Catalog Category and Use Flat Catalog Product, then reindex.
Run a full reindex on the new server to ensure all indexes are up to date:
php bin/magento indexer:reindex
Set all indexers to "Update by Schedule" mode rather than "Update on Save" to prevent indexing operations from blocking customer-facing requests during high-traffic periods.
Optimise Images and Static Assets
Large, unoptimised images are one of the most common causes of poor Magento performance. Before go-live, review your media library and ensure:
-
Product and category images are appropriately sized and compressed
-
Image optimisation is configured within Magento or handled at the CDN level
-
JavaScript and CSS files are minified and merged in production mode
-
Magento's built-in static content deployment has been run: `php bin/magento setup:static-content:deploy`
Review and Tune PHP-FPM and MySQL Settings
Default PHP-FPM and MySQL configurations are rarely optimal for a production Magento store. Key PHP-FPM settings to review include the number of worker processes, the process manager mode (`dynamic` or `ondemand`), and the `max_children` value relative to your available RAM.
For MySQL, key settings to review include `innodb_buffer_pool_size` (typically set to 70–80% of available RAM on a dedicated database server), `query_cache_type`, `max_connections`, and `tmp_table_size`. Changes to these settings require a MySQL restart and should be tested carefully, as incorrect values can cause instability.
Testing and Quality Assurance
Test Site on a Staging Environment
All testing should be carried out on your staging environment before any DNS changes are made. Update your local `hosts` file to point your domain to the new server's IP address so you can test the full site experience without affecting live traffic:
123.456.789.000 yourdomain.com www.yourdomain.com
Walk through the site systematically, checking every page type - homepage, category pages, product pages, search results, CMS pages, and the customer account area. Note and resolve any errors before moving to more detailed testing.
Test Checkout and Payment Flow
The checkout and payment flow is the most critical part of your store to test. Work through the complete purchase journey using test payment credentials:
Add products to the cart and proceed through checkout as a guest and as a logged-in customer
-
Apply discount codes and gift vouchers
-
Test each active payment method
-
Confirm order confirmation emails are sent and received
-
Verify that orders appear correctly in the Magento admin
-
Test the refund process for at least one transaction
Do not go live until you have successfully completed end-to-end purchase tests for every active payment method.
Test All Critical User Journeys
Beyond checkout, test every journey a customer might take through your store:
-
Account registration and login
-
Password reset
-
Product search and filtering
-
Wishlist and comparison functionality
-
Customer account management (order history, address book, saved payment methods)
-
Contact and enquiry forms
-
Any custom functionality specific to your store
Check Mobile Responsiveness
Test the site across a range of real devices and screen sizes, not just browser developer tools. Pay particular attention to the checkout flow on mobile, as this is where responsive issues most often have a direct impact on conversion. Test on both iOS and Android using current browser versions.
Run Performance and Load Tests
Before go-live, confirm that your new server can handle your expected traffic levels. Use a tool such as k6, Loader.io, or Apache JMeter to simulate concurrent users and measure server response under load. Compare the results against your baseline metrics from the environment audit to confirm the migration has delivered the performance improvement you planned for.
Also run Lighthouse or PageSpeed Insights against key pages and review Core Web Vitals scores. Address any significant regressions before go-live.
Validate Forms and Transactional Emails
Test every form on the site - contact forms, newsletter sign-up, account registration, and checkout - and confirm submissions are processed correctly. For transactional emails, trigger each email type and confirm it is delivered, correctly formatted, contains the right content, and passes basic spam filter checks.
SEO and URL Preservation
Audit Existing URLs and Redirects
A hosting migration that breaks URLs or loses redirect rules can cause significant and lasting damage to your organic search rankings. Before cutover, export a full list of your current URLs - product pages, category pages, CMS pages, and any custom redirects - and confirm each one will resolve correctly on the new server.
Check your current `.htaccess` or Nginx configuration for any manually added redirect rules and ensure these are replicated on the new server. Also export your existing Magento URL rewrites from the admin panel and confirm they have transferred correctly with the database.
Migrate Robots.txt and Sitemap
Transfer your `robots.txt` file to the new server and confirm it is accessible at `yourdomain.com/robots.txt`. Review its contents to ensure no important pages are being inadvertently blocked, and that it references the correct sitemap URL.
Regenerate your XML sitemap on the new server - either via the Magento admin under **Marketing > SEO & Search > Site Map** or via the command line - and confirm it is accessible and correctly formatted before go-live.
Set Up 301 Redirects if URLs Change
If your migration involves any URL structure changes - for example, if you are simultaneously restructuring your catalogue or changing URL keys - implement 301 redirects from every old URL to its new equivalent. This is non-negotiable; without redirects, you will lose the link equity and ranking signals associated with those URLs.
Magento's built-in URL rewrite management handles redirects at the application level. For server-level redirects, add rules to your `.htaccess` or Nginx configuration. Test every redirect after implementation to confirm it resolves correctly and returns a genuine 301 status code.
Verify Canonical Tags and Metadata
After the migration, crawl the new site using a tool such as Screaming Frog and check that:
-
Canonical tags are present and point to the correct URLs
-
Meta titles and descriptions have transferred correctly
-
Structured data markup is intact and valid
-
Hreflang tags are correct if you operate a multi-language store
-
No pages that should be indexed are returning noindex tags
Confirm Google Search Console Settings
Before go-live, confirm your Google Search Console property is set up and verified for your domain. After cutover, submit your updated sitemap and monitor the Coverage report for any crawl errors or indexing issues that emerge in the days following the migration. Also check Google Analytics to confirm tracking is firing correctly on the new server.
DNS Cutover and Go-Live
Lower DNS TTL in Advance
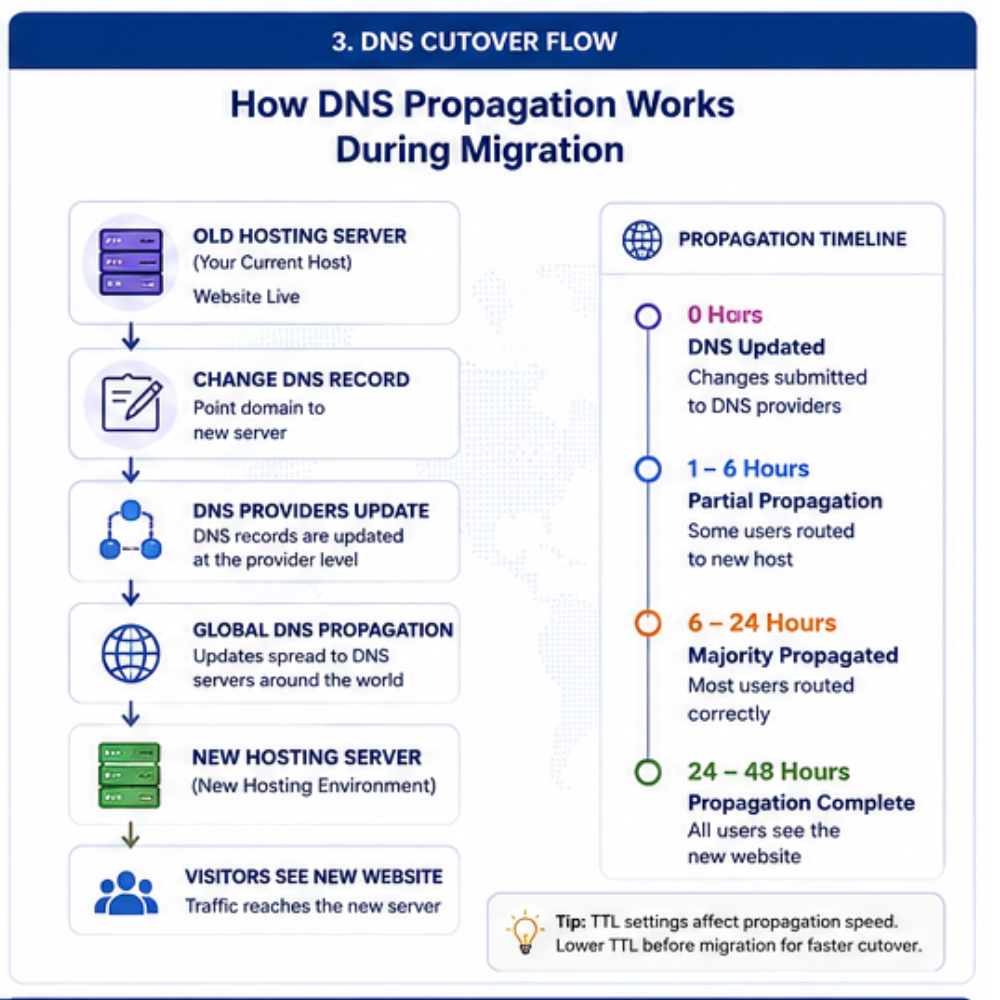
DNS TTL (Time to Live) controls how long DNS records are cached by resolvers around the world. A high TTL means that after you update your DNS records, some visitors will continue to be directed to your old server for hours or even days.
At least 24 to 48 hours before your planned cutover, lower your DNS TTL to 300 seconds (five minutes). This minimises propagation time when you make the actual DNS change and reduces the window during which visitors may be hitting the wrong server.
Update DNS Records
At your chosen cutover time, update your DNS A record to point to your new server's IP address. If you are also migrating your mail server, update your MX records at the same time. Make a note of the exact time you made the change, as this helps you interpret monitoring data in the hours that follow.
If you are using Cloudflare or another proxy-based DNS service, the process may differ slightly - follow your provider's specific instructions for updating origin server details.
Monitor DNS Propagation
Use a tool such as dnschecker.org to monitor DNS propagation across different geographic locations. You are looking for your new server's IP address to appear consistently across all regions. During the propagation window, some visitors will reach your old server and some will reach the new one, this is normal and expected.
Keep both servers live and operational until propagation is complete and you have confirmed the new server is handling traffic correctly.
Enable Maintenance Mode During Cutover
To prevent data inconsistencies caused by orders or customer registrations landing on the old server during the cutover window, enable Magento's maintenance mode on the old server at the point of DNS change:
php bin/magento maintenance:enable
This displays a maintenance page to any visitors still being directed to the old server while DNS propagates. Disable it once propagation is complete and all traffic is confirmed to be hitting the new server.
Disable Maintenance Mode and Confirm Live Site
Once DNS has fully propagated and traffic is flowing to the new server, disable maintenance mode if you had enabled it during cutover:
php bin/magento maintenance:disable
Perform a final smoke test - load the homepage, place a test order, and check the admin panel - to confirm everything is working as expected on the live domain. Check your monitoring tools to confirm normal traffic patterns are being seen on the new server.
Post-Migration Monitoring and Cleanup
Monitor Server Logs for Errors
In the hours and days immediately following go-live, monitor your server and application logs closely for any errors that did not surface during staging testing. Key logs to watch include:
-
Magento exception log** - `var/log/exception.log`
-
Magento system log** - `var/log/system.log`
-
Nginx or Apache error log** - typically at `/var/log/nginx/error.log` or `/var/log/apache2/error.log`
-
PHP-FPM log - for PHP errors not caught by Magento's logging
Set up log monitoring alerts if your hosting plan or monitoring tools support it, so you are notified immediately of any critical errors rather than discovering them after the fact.
Check Uptime and Performance Metrics
Compare real-world performance on the new server against the baseline metrics you captured during the environment audit. Key metrics to review in the days following go-live include:
-
Page load times and TTFB across key page types
-
Core Web Vitals scores
-
Server CPU and memory usage under real traffic
-
Cache hit rates for full-page cache and Redis
-
Error rates and HTTP status code distribution
If performance is not meeting expectations, investigate before the issue compounds. Common post-migration culprits include misconfigured caching, suboptimal PHP-FPM settings, or missing indexes.
Verify Orders and Transactions Are Processing
Confirm that real orders are being placed successfully, payment transactions are being processed and settled, order confirmation emails are being delivered, and fulfilment integrations are receiving order data. Check your payment gateway dashboard and your ERP or order management system to confirm data is flowing correctly.
If you notice any orders that failed or any payments that did not settle, investigate immediately. Payment processing issues in the early post-migration period are among the most commercially damaging problems you can encounter.
Test Admin Panel Functionality
Log into the Magento admin panel and verify that core administrative functions are working correctly:
-
Product creation and editing
-
Order management and status updates
-
Customer account management
-
Report generation
-
Cache management and flushing
-
Index management
Also confirm that any admin-facing extensions or integrations - such as ERP sync tools or custom reporting dashboards - are functioning as expected.
Remove Old Server Access and Credentials
Once you are confident the migration is successful and the new server is stable, begin decommissioning your old environment:
-
Revoke SSH access keys for the old server
-
Remove or rotate any shared credentials that were used during the migration
-
Cancel or downgrade your old hosting plan, observing any notice periods required by your contract
-
Remove your new server's IP from any temporary whitelist entries that were set up for testing
-
Archive your migration backups in long-term storage and update your backup documentation
Do not decommission the old server immediately after go-live. Keep it available for at least two to four weeks as a fallback reference, particularly if any post-migration issues emerge that require comparing configurations.
Document the New Environment
Update your internal documentation to reflect the new hosting environment. At minimum, record:
-
New server IP address, hostname, and data centre location
-
SSH access details and key management procedure
-
Software stack versions (OS, web server, PHP, MySQL, Redis, Elasticsearch)
-
Hosting provider contact details and support escalation process
-
Backup schedule and restoration procedure
-
Monitoring tools and alert configuration
-
Any custom server configuration decisions made during the migration and the rationale behind them
Good documentation is the difference between a smooth response and a chaotic one when something goes wrong at 2am on a Bank Holiday. Treat it as a deliverable, not an afterthought.